How to Install Odoo 17 on Windows 11? A Step-by-Step Guide
Abid Patel
27-Aug-2024 Updated : 28-Aug-2024
Learn how to install Odoo 17 on Windows 11 with this comprehensive step-by-step guide. Perfect for beginners and advanced users alike, follow these clear instructions to get Odoo up and running on your system.

Odoo, an all-in-one management software that offers a range of business applications, has become increasingly popular for its modular structure and flexibility. With the release of Odoo 17, businesses and developers are keen to explore its new features and enhancements. This guide will walk you through the installation process of Odoo 17 on Windows 11, ensuring you can get up and running quickly and efficiently.
Step-by-Step Installation Guide:
1. Review System Requirements
2. Install Python
3. Install PostgreSQL
4. Set Up Dependencies
5. Install Odoo 17 and Run
6. Configure Odoo 17
7. Restart Services in Odoo 17
8.Adding a Custom Addons Path in Odoo 17 on Windows
9. Common Installation Issues and Solutions
10. Conclusion
1. System Requirements
Before starting the installation, ensure your system meets the following requirements:
- Operating System: Windows (64-bit)
- Processor: 2.0 GHz or faster
- RAM: Minimum 4 GB (8 GB recommended)
- Storage: At least 20 GB free space
- Python Version: Python 3.8 or higher
- PostgreSQL Version: PostgreSQL 12 or higher
2. Installing Python
Odoo 17 is built on Python, so the first step is to install Python on your Windows 11 system.
Step 1:- Download Python:
Visit the official Python website and download the latest version of Python 3. Ensure the version is 3.8 or higher.
Link:- https://www.python.org/downloads

Step 2:- Install Python:
Run the installer and check the box that says "Add Python to PATH." This step is crucial for the command prompt to recognize Python commands.
Click on "Install Now" and follow the prompts to complete the installation.
Step 3:- Verify Installation:
Open the command prompt and type ' python --version '. If the installation was successful, the version of Python installed will be displayed.
3. Installing PostgreSQL
PostgreSQL is the database system used by Odoo. You need to install it and set up a user for Odoo.
Step 1:- Download PostgreSQL:
Go to the PostgreSQL website and download the installer for Windows.
Link:- https://www.enterprisedb.com/downloads/postgres-postgresql-downloads

Step 2:- Install PostgreSQL:
Run the installer, and during the setup, choose the default settings. When prompted, set a password for the PostgreSQL superuser (usually postgres). Remember this password, as you'll need it later.
Step 3:- Configure PostgreSQL:
After installation, open the pgAdmin tool that comes with PostgreSQL. Use this tool to create a new database user (role) named 'odoo' with a password of your choice.
Grant this user all privileges on the new database you create, typically named odoo17
4. Setting Up Dependencies - Install Pip
Odoo requires several Python packages and other dependencies to function correctly.
Step 1:- Install pip:
Python comes with pip, a package manager that you will use to install the required dependencies. If not installed, you can install it by running 'python -m ensurepip' in the command prompt.
Step 2:- Install Required Packages:
Create a directory where you want to install Odoo. Open the command prompt, navigate to this directory, and run the following commands:
' pip install -r https://raw.githubusercontent.com/odoo/odoo/17.0/requirements.txt '
5. Installing Odoo 17
Now that you have Python and PostgreSQL set up, you can proceed to install Odoo 17.
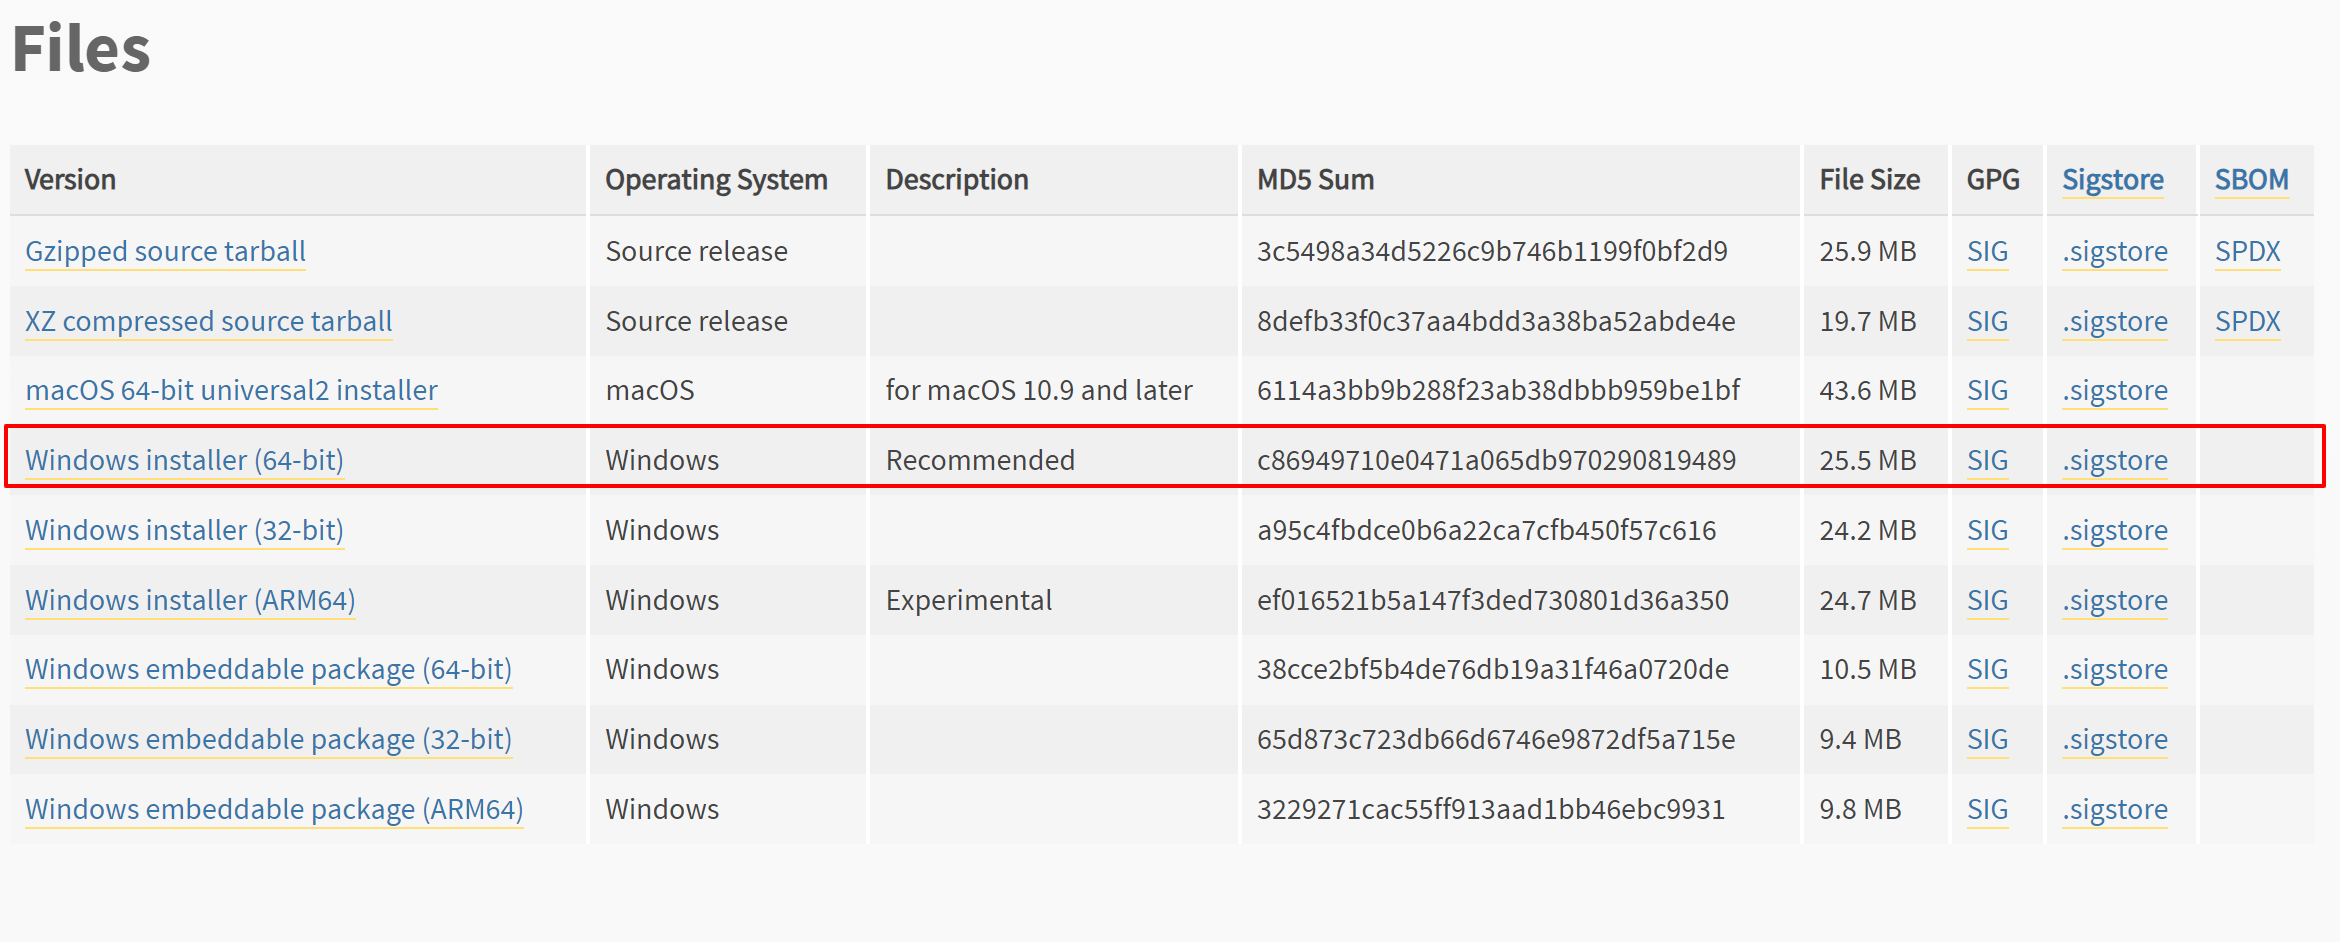
Step 1:- Download Odoo 17
Visit the official Odoo GitHub repository or download the Odoo 17 package directly from the Odoo website.
Download link:- https://www.odoo.com/page/download

Step 2:- Install Odoo app (odoo_17.0.latest):
Run the installer, and during the setup, choose your desired options for database configuration and modules. Complete the installation to get the latest Odoo 17.0 app up and running on your Windows system efficiently.
6. Configure Odoo 17
Before running Odoo, you need to make some configurations to ensure everything works smoothly.
Step 1:- Edit the Configuration File:
Open the odoo.conf file in a text editor and modify the following lines:
Step 2:- Save the File:
After making the changes, save the configuration file.
7. Restarting Odoo 17 Service in Windows
Simple Steps to Manage Odoo 17 Service on Your Windows PC. This guide will help you efficiently manage the Odoo 17 service on your Windows PC.
Step 1:- Open the Start Menu:
Press the Windows key on your keyboard to open the Start Menu.
Step 2:- Search for Services:
In the search bar, type "services" and select the Services app from the search results.
Step 3:- Locate the Odoo Service:
In the Services window, scroll down to find "odoo-server-17.0" in the list of services.
Step 4:- Manage the Odoo Service
Start: If the service is not running, click Start to initiate it.
Restart: Click Restart to refresh the service if it’s already running.
Stop: Click Stop to halt the service temporarily.
Step 5:- Close the Services Window
Once you've completed the action, you can close the Services window.
8. Adding a Custom Addons Path in Odoo 17 on Windows
Learn how to easily add a custom addons path to your Odoo 17 installation on Windows. This step-by-step guide will walk you through locating the odoo.conf file, editing the addons path, and restarting the service to ensure your custom modules are recognized by Odoo.
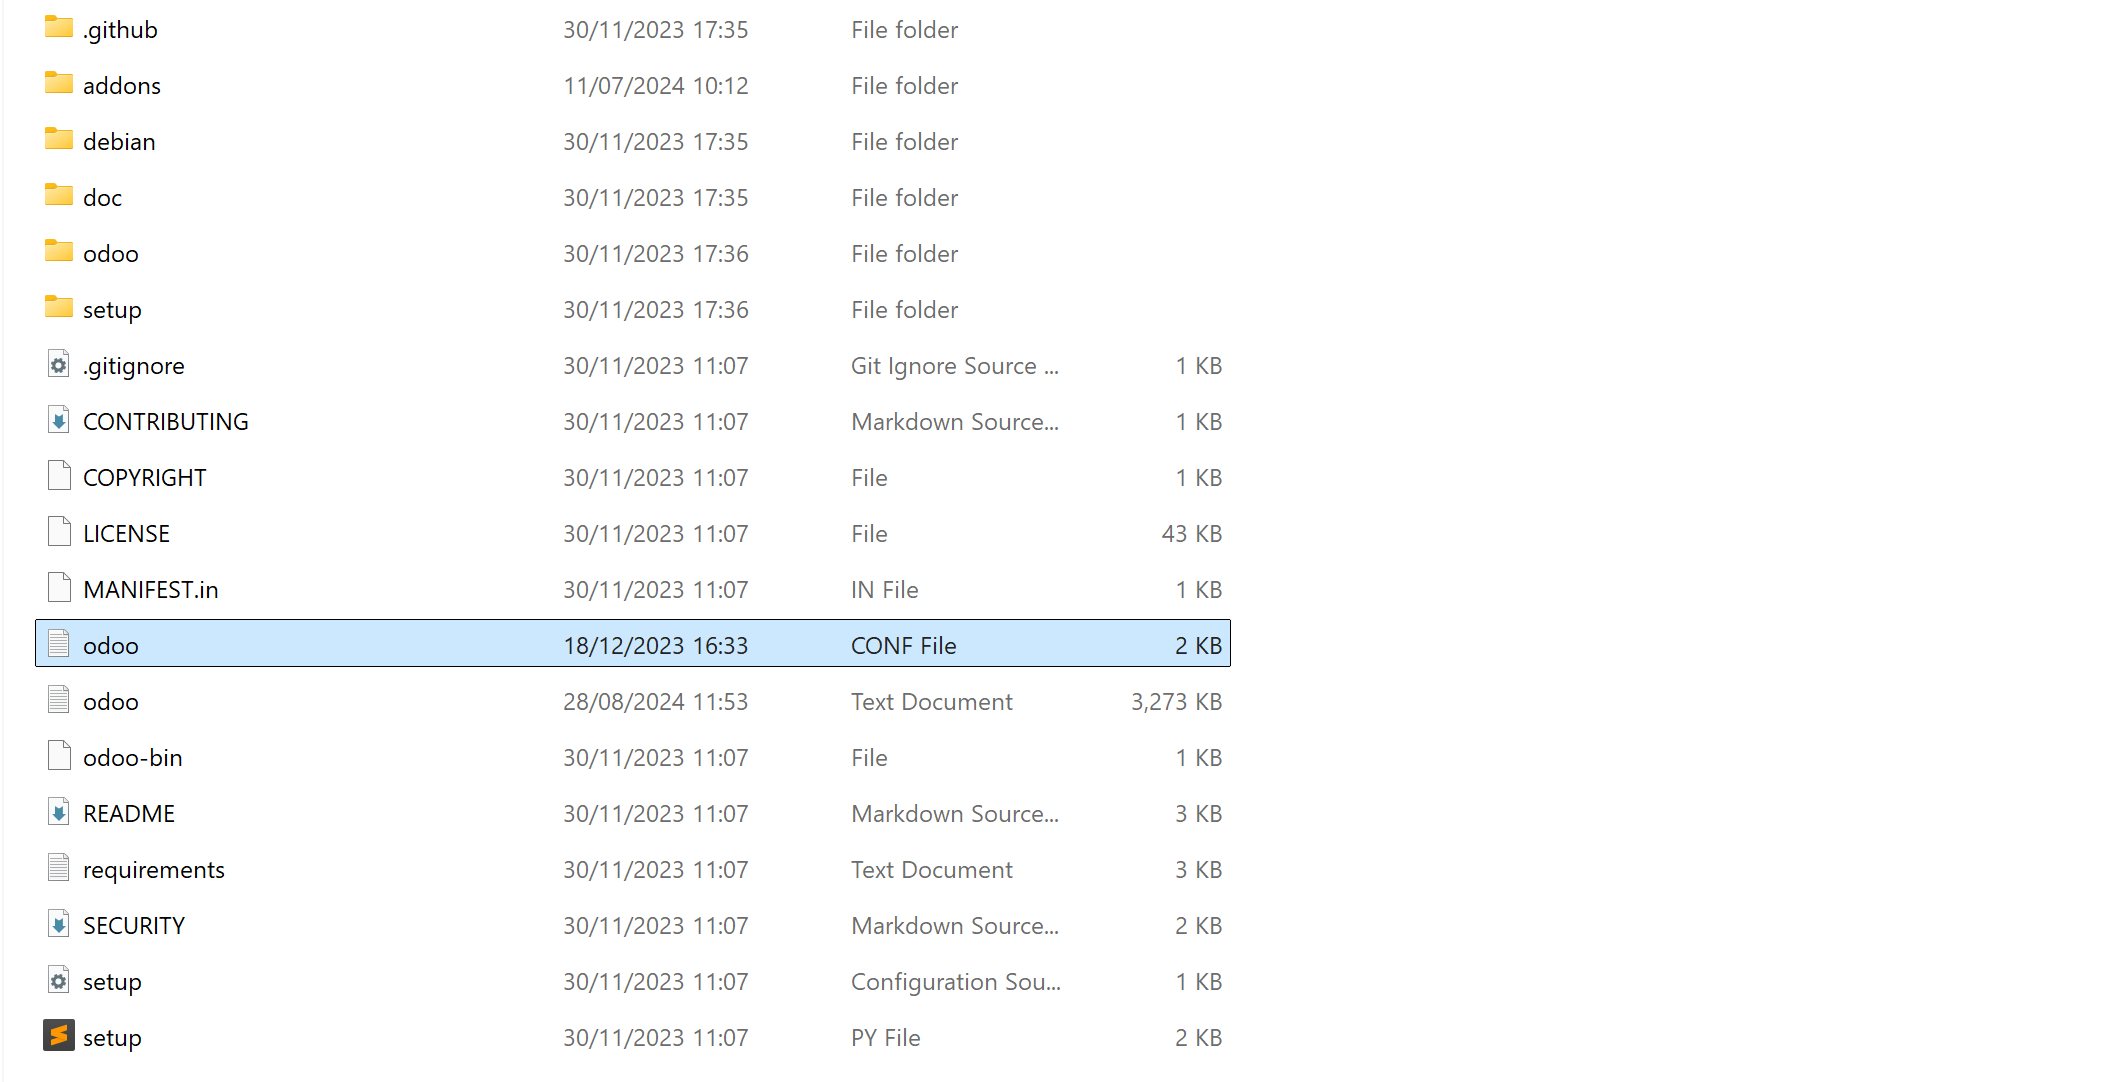
Step 1:- Navigate to the Odoo Installation Directory
Go to the directory where Odoo 17 is installed on your Windows system.
Step 2:- Locate the 'odoo17' Folder
Open the 'odoo17' folder, then click on the 'server' folder.
Step 3:- Edit the 'odoo.conf' File
Find the file named 'odoo.conf' in the 'server' directory
Open the 'odoo.conf' file with a text editor like Notepad.
Step 4:- Modify the Addons Path
Locate the line that reads: addons_path = c:\odoo17\server\odoo\addons.
Add your custom module path to this line. For example: addons_path = c:\odoo17\server\odoo\addons, c:\path\to\your\custom\module.
Step 5:- Save and Close the File
Save the changes to the 'odoo.conf' file and close the text editor.
Step 6:- Restart the Odoo Service
Press the Windows key, search for "services", find "odoo-server-17.0", and click Restart.
9. Common Installation Issues and Solutions
Even with careful following of the steps, you might encounter some issues. Here are some common problems and their solutions:
1. Python Not Recognized:
Ensure that Python is added to your system’s PATH. If not, add it manually through the system environment variables.
2. PostgreSQL Connection Issues:
Double-check the database name, username, and password in the odoo.conf file. Make sure PostgreSQL is running.
3. Missing Dependencies:
If you receive errors about missing Python packages, run pip install for the missing packages as indicated by the error messages.
10. Conclusion
Installing Odoo 17 on Windows 11 might seem challenging, but with the right guidance, it can be straightforward. By following the steps outlined in this guide, you’ll have Odoo 17 up and running in no time, allowing you to take full advantage of its powerful business management tools.
If you encounter any issues or have questions, the Odoo community is a valuable resource for troubleshooting and advice. Happy installing!
This blog post should help users install Odoo 17 on their Windows 11 system with ease, offering both a step-by-step guide and solutions to common installation issues.
Make a Comment
Your email address will not be published. Required fields are marked *